Creating Custom Wearables#
This guide walks you through the process of creating and packaging skeletal mesh based custom wearables using HELIX Studio, such as clothing (e.g. shoes, shirts, bottoms, outfits), hair (facial and head), and accessories (e.g. hats, gloves, masks, necklaces, glasses). Some specific adjustments may be required depending on the asset type, such as dynamic hair sim. Please refer to our Dynamic Hair documentation for more details.
By the end you will have a custom wearable that players can select and equip on their characters at runtime.
Chaos Cloth Is Not Supported
We currently only support rigid body physics on clothing. Chaos cloth (wearable physics) is not supported and there are no plans to support it any time soon. This is due to multiple reasons, primarily compatibility issues with mutable and how it affects performance.
Prerequisites#
Before you begin, make sure you have:
- HELIX Studio installed and launched (refer to this guide).
- A HELIX account, logged in within HELIX Studio (required for the Packages tools and HELIX Vault upload).
- A 3D modelling package (this guide uses Blender, as it is free and the most accessible; the core principles apply to most modelling applications).
- Your wearable textures prepared, if applicable.
All Custom Assets Must Live in Your Plugin Folder
Everything specific to your wearable — skeletal mesh, materials, material instances, textures, icons, custom data assets — must be imported or saved inside your package plugin folder (e.g. /YourPackage/...). Assets stored elsewhere (in /Game/, other plugins, etc.) will be excluded during packaging and your wearable will appear broken (missing textures, default materials, etc.) in the shipped game, even though it looks fine in HELIX Studio.
Shared HELIX assets (certain master materials, LOD settings) are an exception — they ship as part of HELIX itself, so you can reference them safely from anywhere.
1. Set Up HELIX Studio Project#
- Launch HELIX Studio
- Select the HELIX tab to see the template projects
- Select the appropriate template (we'll be using the Wearables template)
- Define the project save location and project name
-
Hit
Create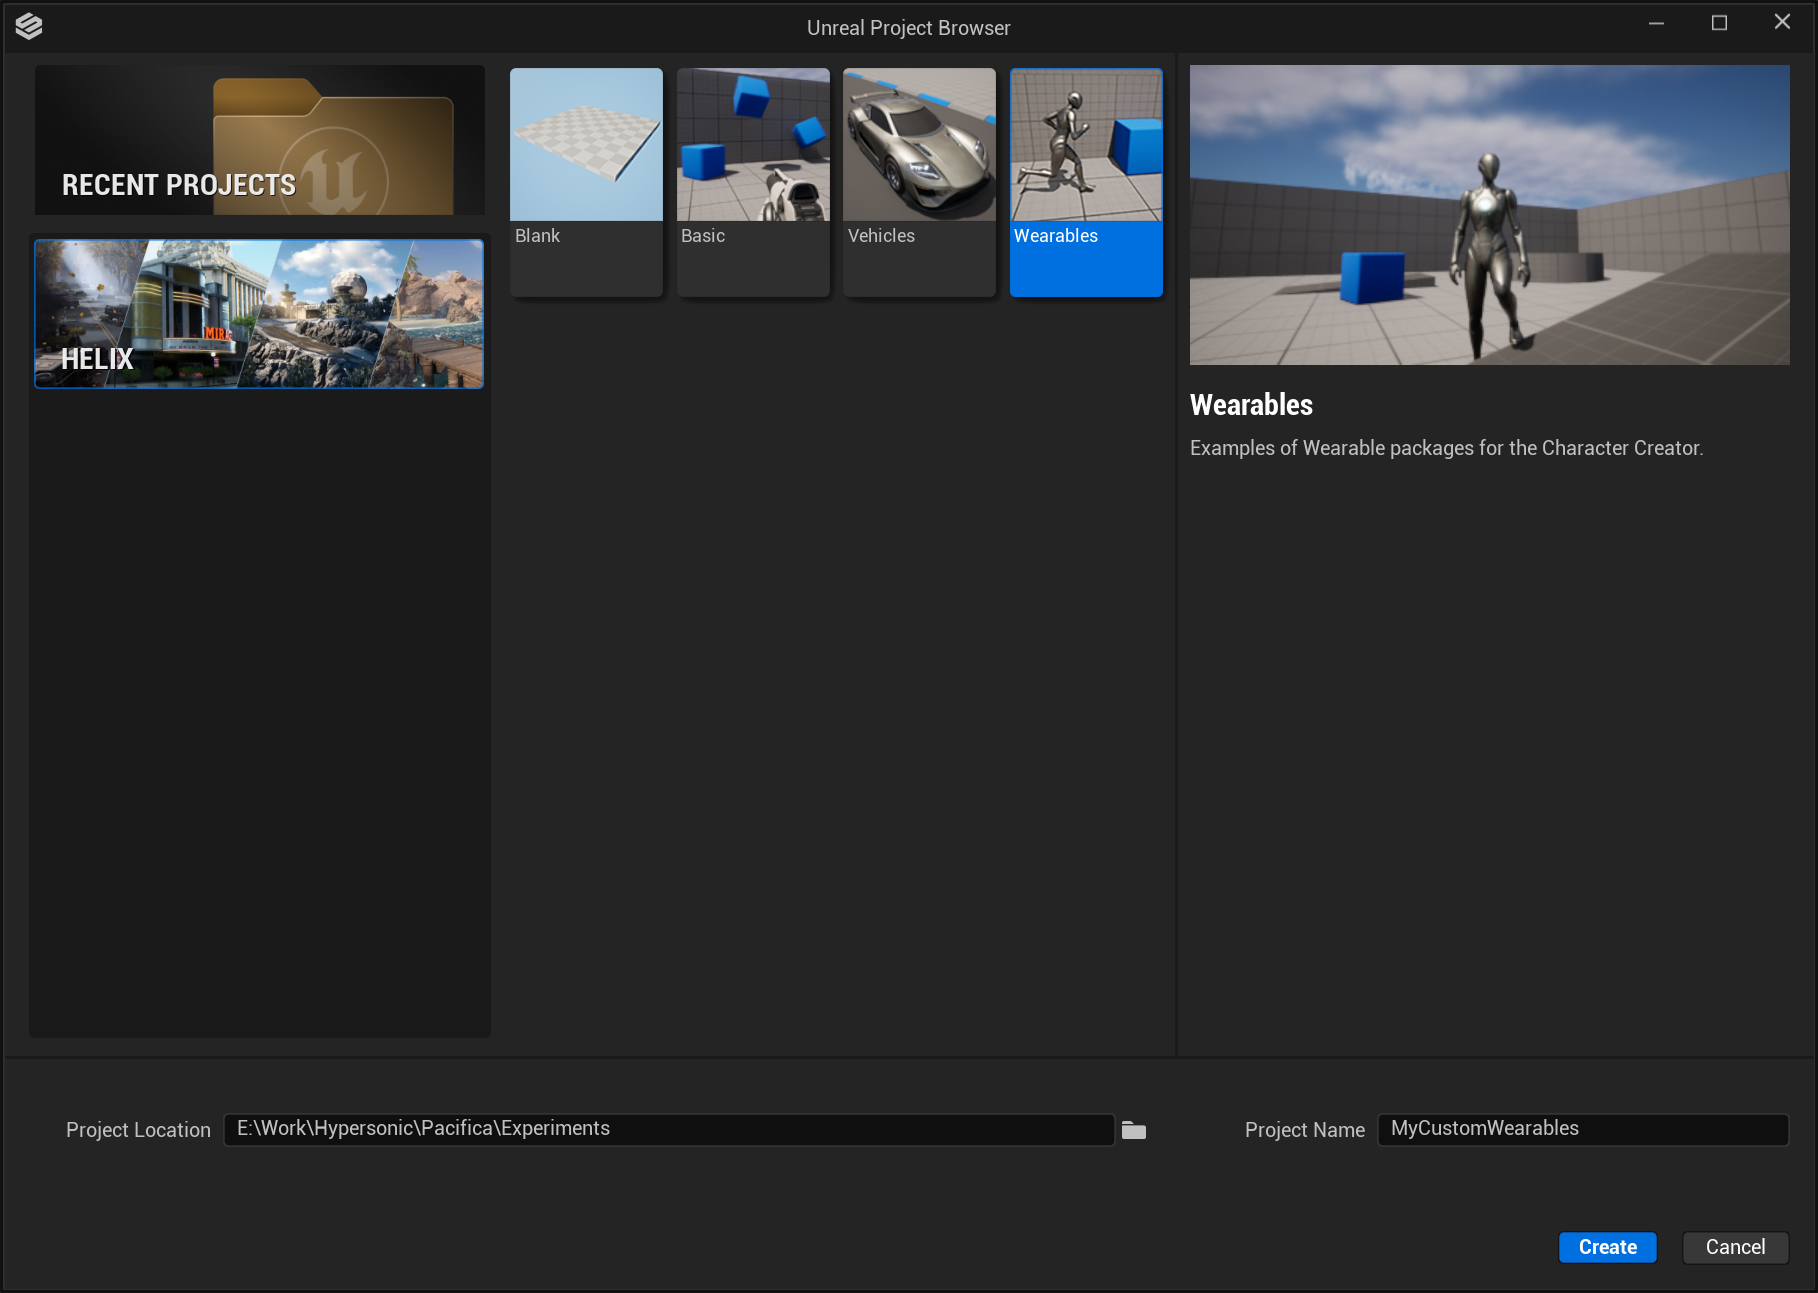
2. Create a Package#
To create a package, use the Packages dropdown in the toolbar above the viewport. If you don't see this, you may need to log in to your HELIX account and potentially restart HELIX Studio.
-
Navigate to
Packages > Manage Packages > New Package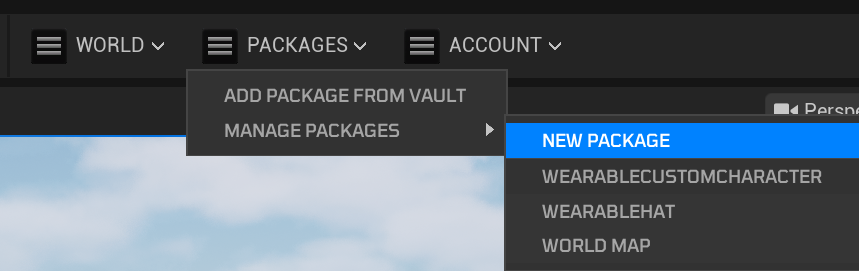
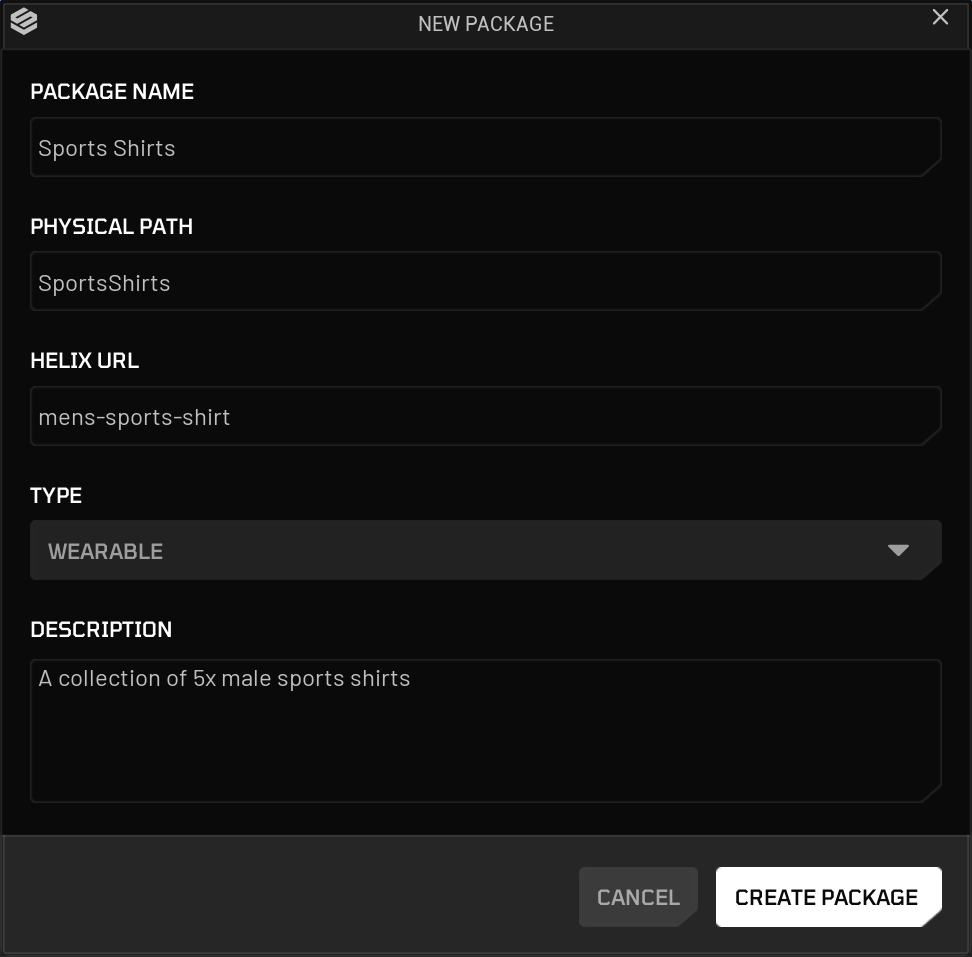
-
Enter a unique Package Name (e.g. Sports Shirts).
- Select the appropriate package type for your package, e.g. Wearable.
- Add a suitable description.
- Create a unique package URL (use
-for spacing, e.g.wearable-johns-sneakers; uppercase characters are not allowed). -
Click Create Package. This action creates a dedicated plugin folder for your assets (e.g. Plugins/SportsShirts) — this is where you put all of the custom content that makes up your package.
3. Obtain Character Template Assets#
To create or adjust wearables to be compatible with HELIX, we've provided some meshes to serve as a guide. You can find them in the HELIX Character Creator engine plugin, in the templates folder: /HelixCharacterCreator/Templates
Note
You can paste paths to these directories directly into the content browser path (where it will likely currently say All > Plugins > {your package name}) by clicking the empty space in the bar.
Each template asset group can be found in the folders below:
- Full body meshes:
/HelixCharacterCreator/Templates/Body - Split body part meshes:
/HelixCharacterCreator/Templates/Body/Cut - Head meshes:
/HelixCharacterCreator/Templates/Head
Note
HELIX Character Creator currently uses SKM_F_UNDW_Tall for female, and SKM_M_NRW_Tall variations as the male base mesh.
Although both male and female characters use the same skeleton, if you want your clothing item to be available for both genders, you will need to create two versions of your item, adjusting it individually to each body (i.e. Male & Female).
To export the template assets for use in a modelling package of your choice (e.g. Blender), you will need to export them out of HELIX Studio.
- For each mesh you want to export,
right clickit, go toAsset Actions, thenExport. - Name and save the asset in a suitable folder on your PC.
-
After clicking
Save, the export window will appear. There, make sure you haveLevel of Detail (LOD)ticked under the Mesh tab. (This is important because if you're making custom LOD models, you should model them around the corresponding LOD mesh to prevent clipping.)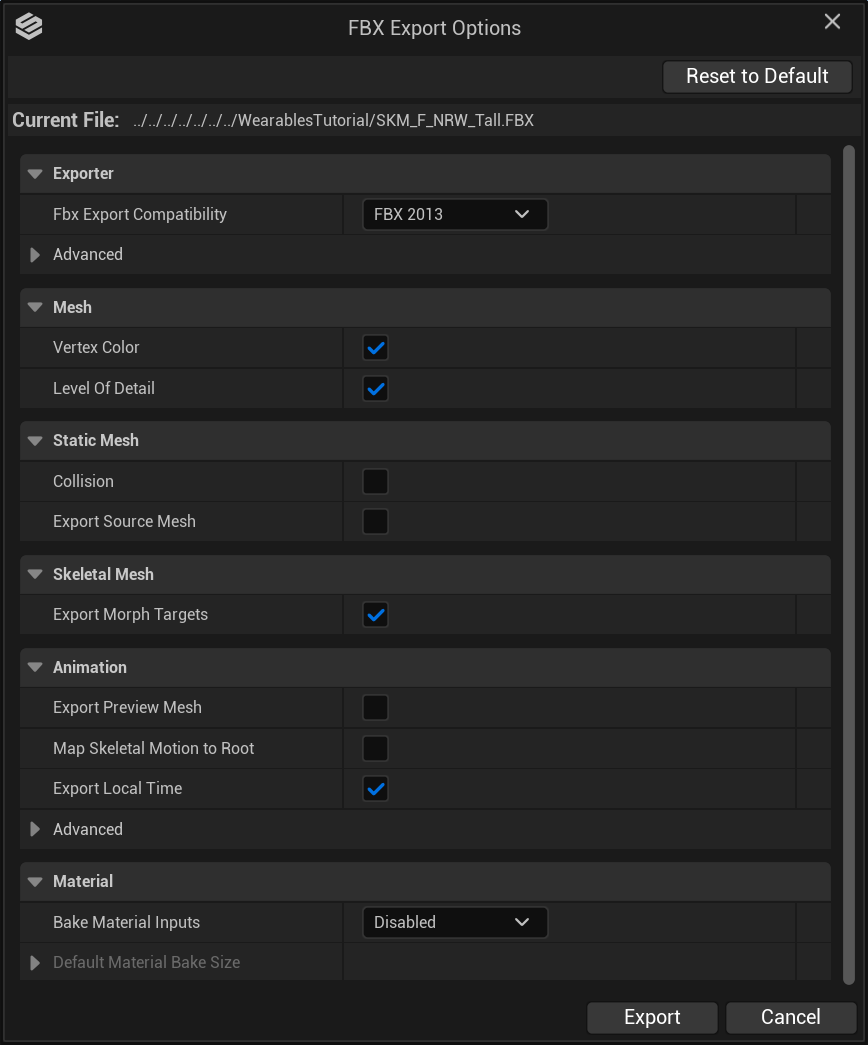
-
Do this for all required template assets.
4. Create Your Clothing#
Exactly how you create your wearables and which modelling applications you use is up to you, but there are a few principles that are important to get right. The next few sections provide a breakdown of how to approach the creation of wearables. The examples are given using Blender as it's free and the most accessible 3D package. The core principles apply to most/all modelling applications.
- Import a body or body part template into your modelling package.
- Model your clothing item around the template body, OR if you're using an existing wearable, adjust your model to fit the body. (Make sure you have good topology, especially around joints such as the knees.) - If you're creating multiple custom LODs, it's helpful to hide all other body lods while you work to make sure your mesh fits around the corresponding lod.
- Apply transforms to your model when done (so Location and Rotation equal 0,0,0 and Scale equals 1,1,1). To do this in Blender, with your model selected press
Ctrl + Aand selectAll Transforms.
Armature Binding & Transferring Weights#
To get your item of clothing to move with the body, you will need to parent the wearable mesh to the skeleton. Below are the steps to do this in Blender; other programs will differ slightly.
- Select your wearable mesh and
Shift-select the armature (shown in the viewport as pyramids with spheres on the ends, or as "root" in the hierarchy). - Press
Ctrl + Pto parent, then select "With Automatic Weights".
Warning
If you get a warning regarding unresolved bones, bone weighting issues, etc., you will need to investigate the cause further. Some things to check:
1 - Apply transforms as described above.
2 - Make sure your mesh has no duplicate/overlapping vertices. To fix this, with your model selected, enter Edit Mode (Tab), enter vertex select mode, press A to select all vertices, then hit M and select "By Distance".
Regardless of whether weights transfer correctly, you will likely need to weight paint by hand. Feel free to move the armature points back and forth from time to time to see how your mesh deforms and whether it looks correct.
5. Set Up Your Clothing For Exporting#
Once your item of clothing is created, bound to the armature, and the weights are painted, you'll need to set up the hierarchy correctly, so it's ready to export to HELIX Studo.
To do this:
- In the outliner, open up the "root" / armature parent.
-
Select all children of the imported template model, including root (in this case, everything under "SKM_F_UNDW_Tall").
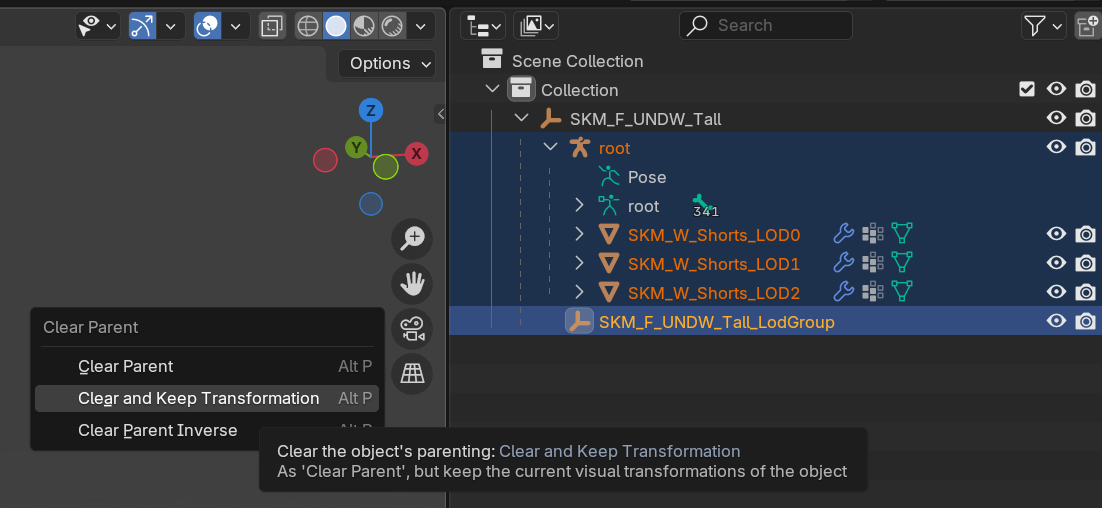
-
With all children selected, press
Alt + Pand select "Clear and Keep Transformation". - Now delete the body meshes and the parent empty.
- You should be left with root, the reference model LodGroup, and your wearable mesh(es).
- Rename the LodGroup to an appropriate name, e.g.
SKM_F_Undw_Shorts_LodGroup. - Then select your wearable mesh (select all LOD meshes if you have created multiple LODs).
- With them selected,
Ctrl-select the LodGroup. -
Then press
Ctrl + Pand select "Object".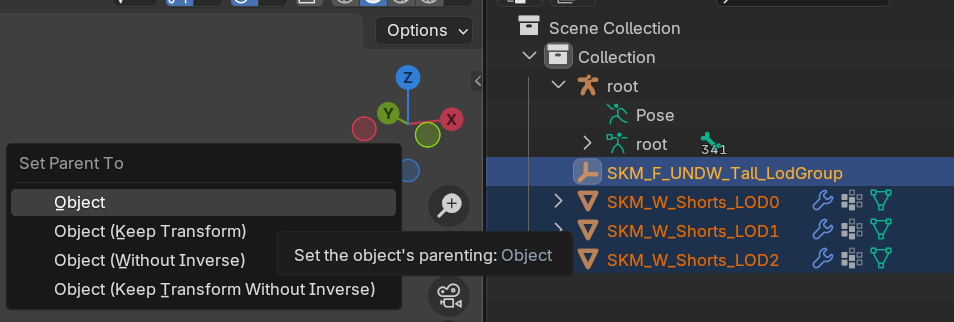
LOD Setup (if Applicable)
- Select LOD Group parent.
- In the Object tab, under Custom Properties, create a new property by pressing "New".
- Press the cog icon.
- Set:
- Type =
String - Property Name =
fbx_type - Default Value =
LodGroup
- Type =
- Click OK.
- Then change the value from
1toLodGroup.
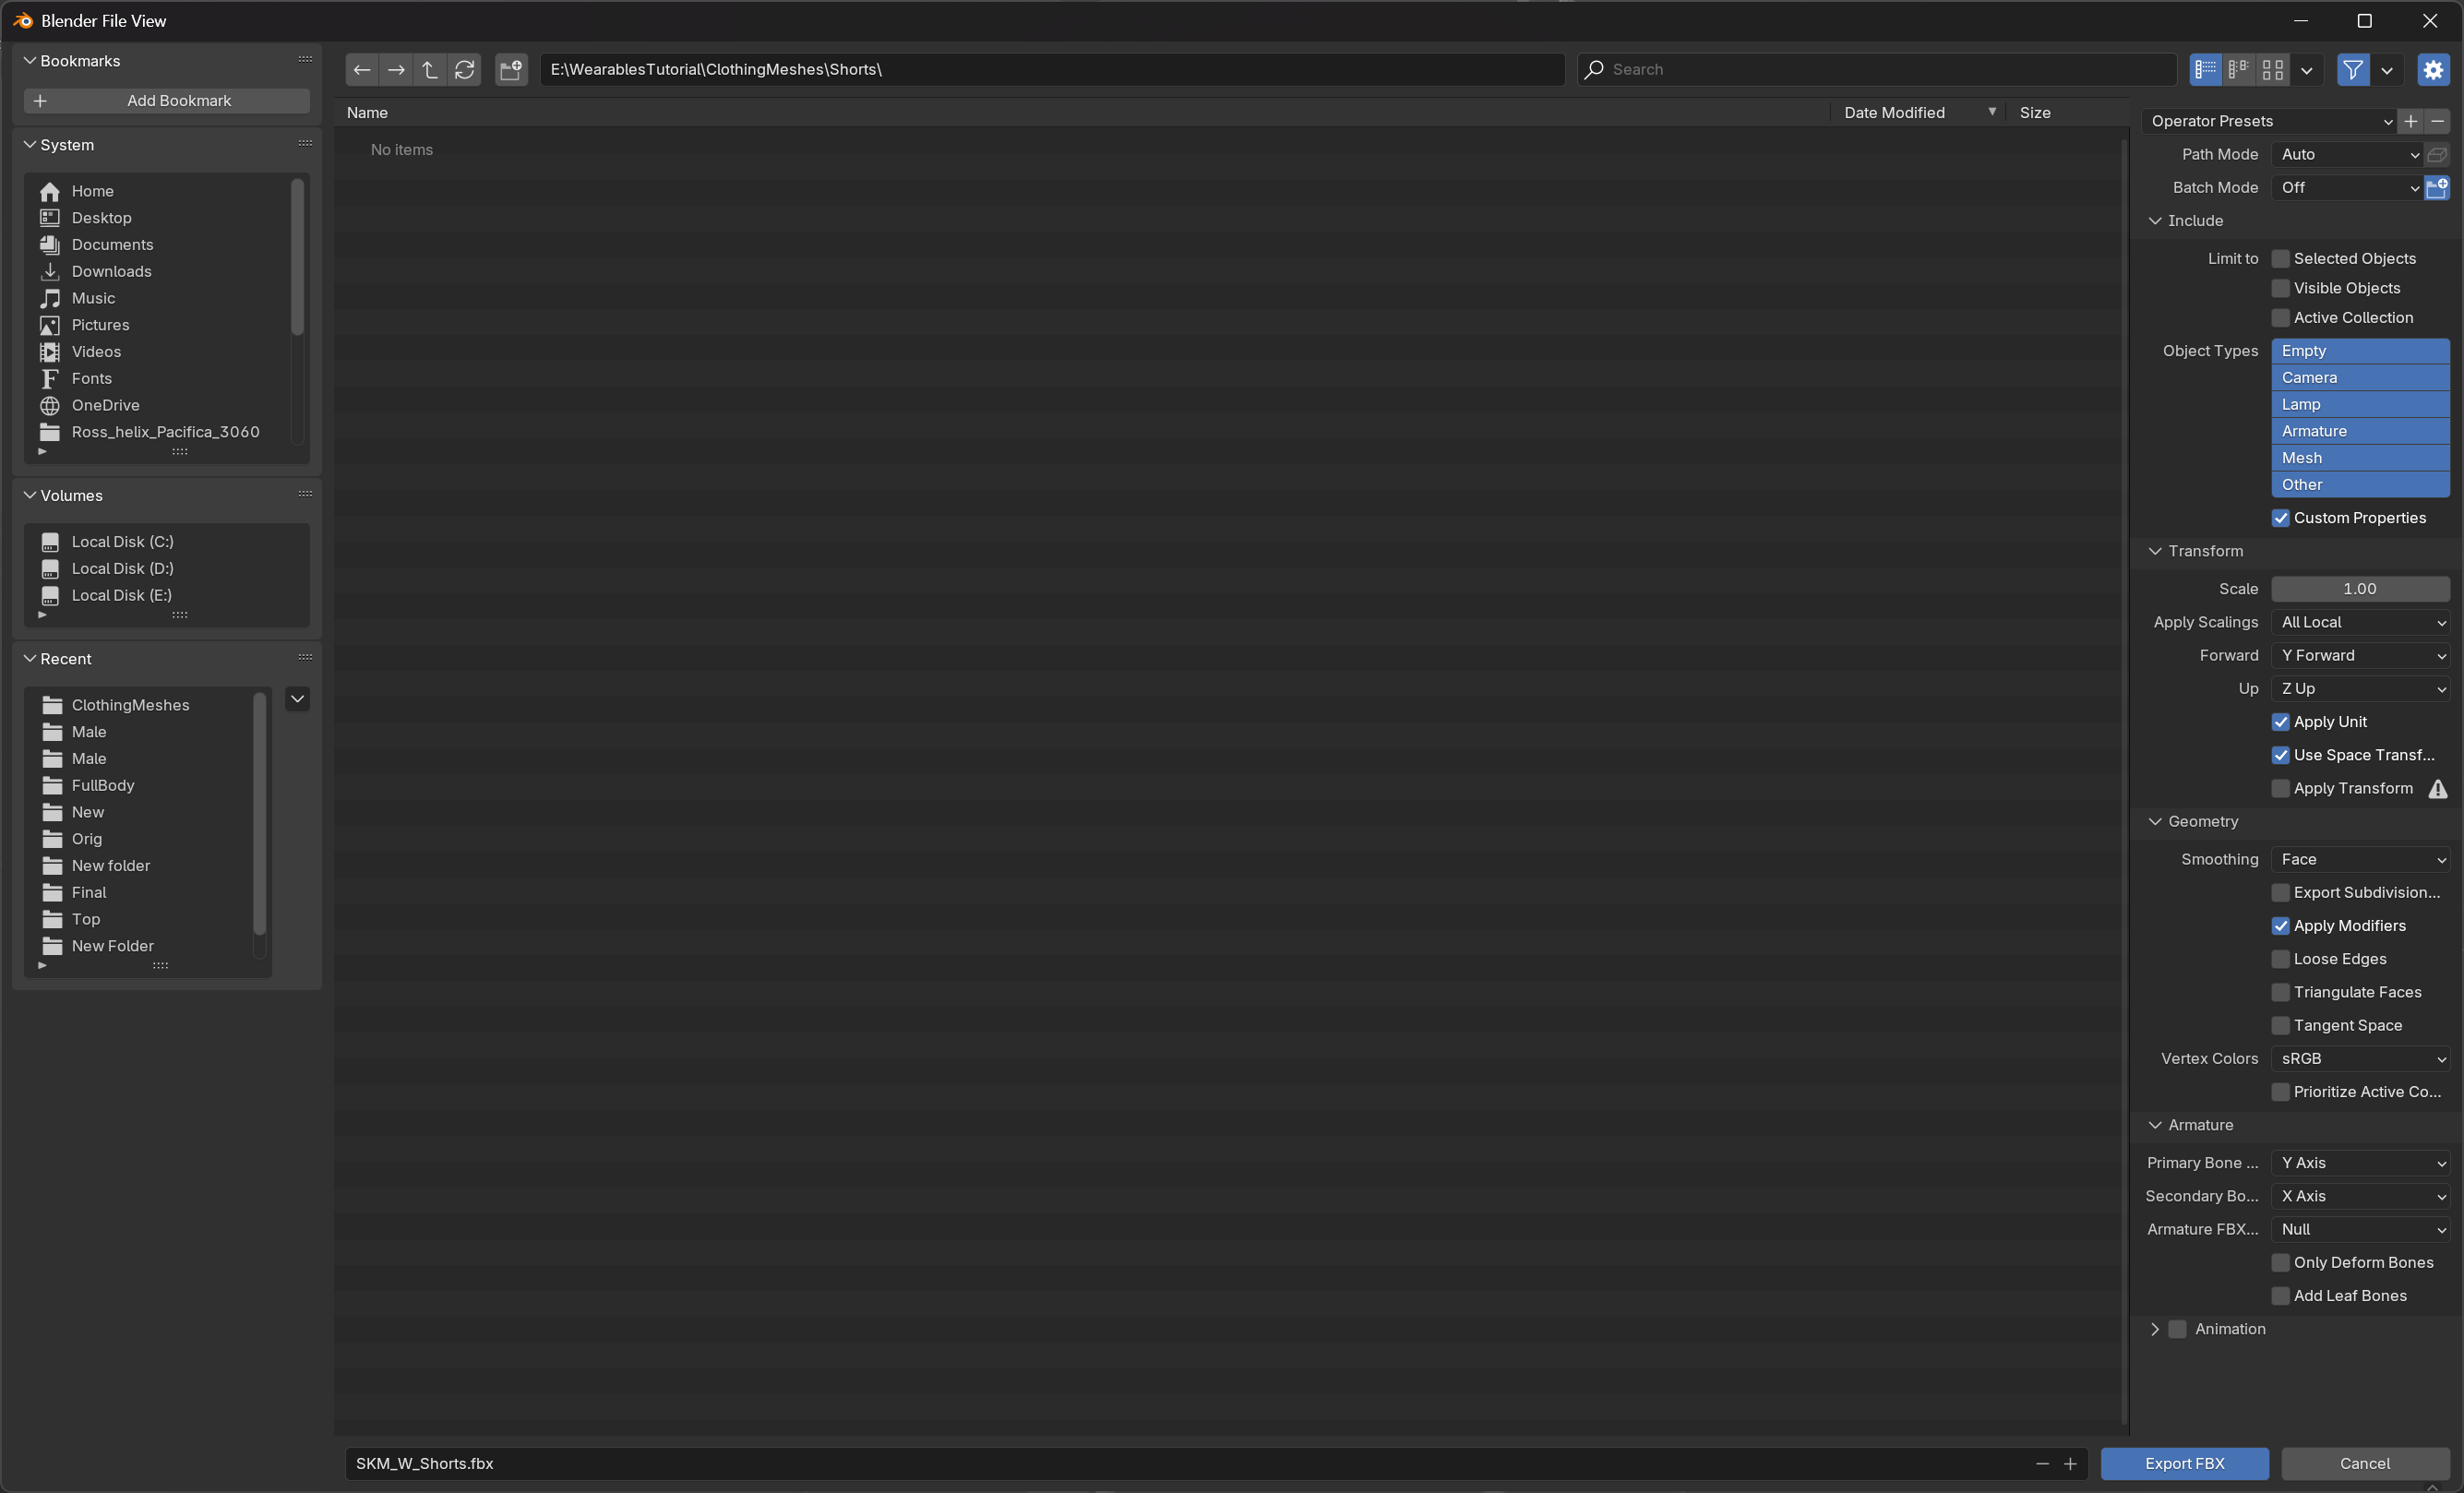
6. Export Your Wearable#
- Make sure your outliner only includes "root" (the armature) and the LodGroup containing your mesh(es).
- Navigate to
File > Export > FBX. - Define a save location.
- Name your wearable appropriately (follow the naming conventions: for skeletal meshes, use the prefix
SKM_). - Make sure you enable
Custom Properties. - Set
Forward AxistoY ForwardandUptoZ Up. - In Armature settings, set the
Primary Bone AxistoYand theSecondary Bone AxistoX. - Make sure
Add Leaf Bonesis deselected. -
To avoid any doubt, copy the settings from the image below.
7. Import Into HELIX Studio#
Next, import your model into HELIX Studio. You must import your assets into the correct package folder (e.g. the package you created in the Package Creation section). To find your package again:
-
Navigate to
Packages > Manage Packages > YourPackageName.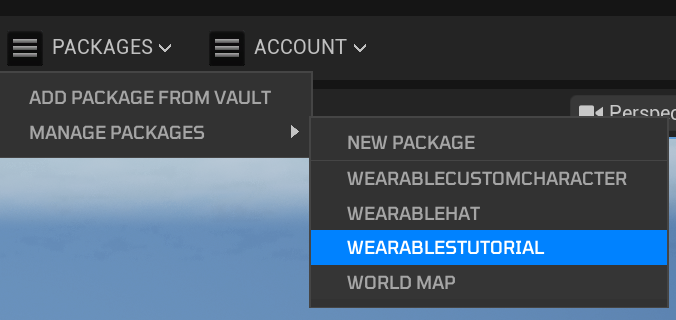
-
With your package window open, press "OPEN IN CONTENT BROWSER". This takes you to the location of your package.

Import Skeletal Mesh#
With the content browser now inside the correct folder, you can add your mesh.
- To add your mesh, either drag your
FBXfile from Windows Explorer into the content browser, or press the Import button and navigate to the file. - In the
Import Contentwindow, set a few settings:- If you made multiple LOD meshes, make sure "Import LODs" is ticked (in
All -> Common Meshes). - Uncheck "Create Physics Asset" (in
All -> Skeletal Meshes). - Uncheck "Import Materials" (in
All -> Materials). - IMPORTANT: Set "Skeleton" to:
Face_Archetype_Skeleton(inAll -> Common Skeletal Meshes and Animations) if you are creating a head wearable. If you see multiple, hover over each and select the one located in/MetaHumanCharacter/Face/Face_Archetype_Skeleton.metahuman_base_skel(inAll -> Common Skeletal Meshes and Animations) for anything else. If you see multiple, hover over each and select the one located inMetaHumanCharacter/Female/Medium/NormalWeight/body.
- If you made multiple LOD meshes, make sure "Import LODs" is ticked (in
- Then press "Import".
Clipping issues? Incorrect skinning fix here!
If you open your wearable (double click it) and play a preview animation, you may see weight issues as demonstrated in the image below.
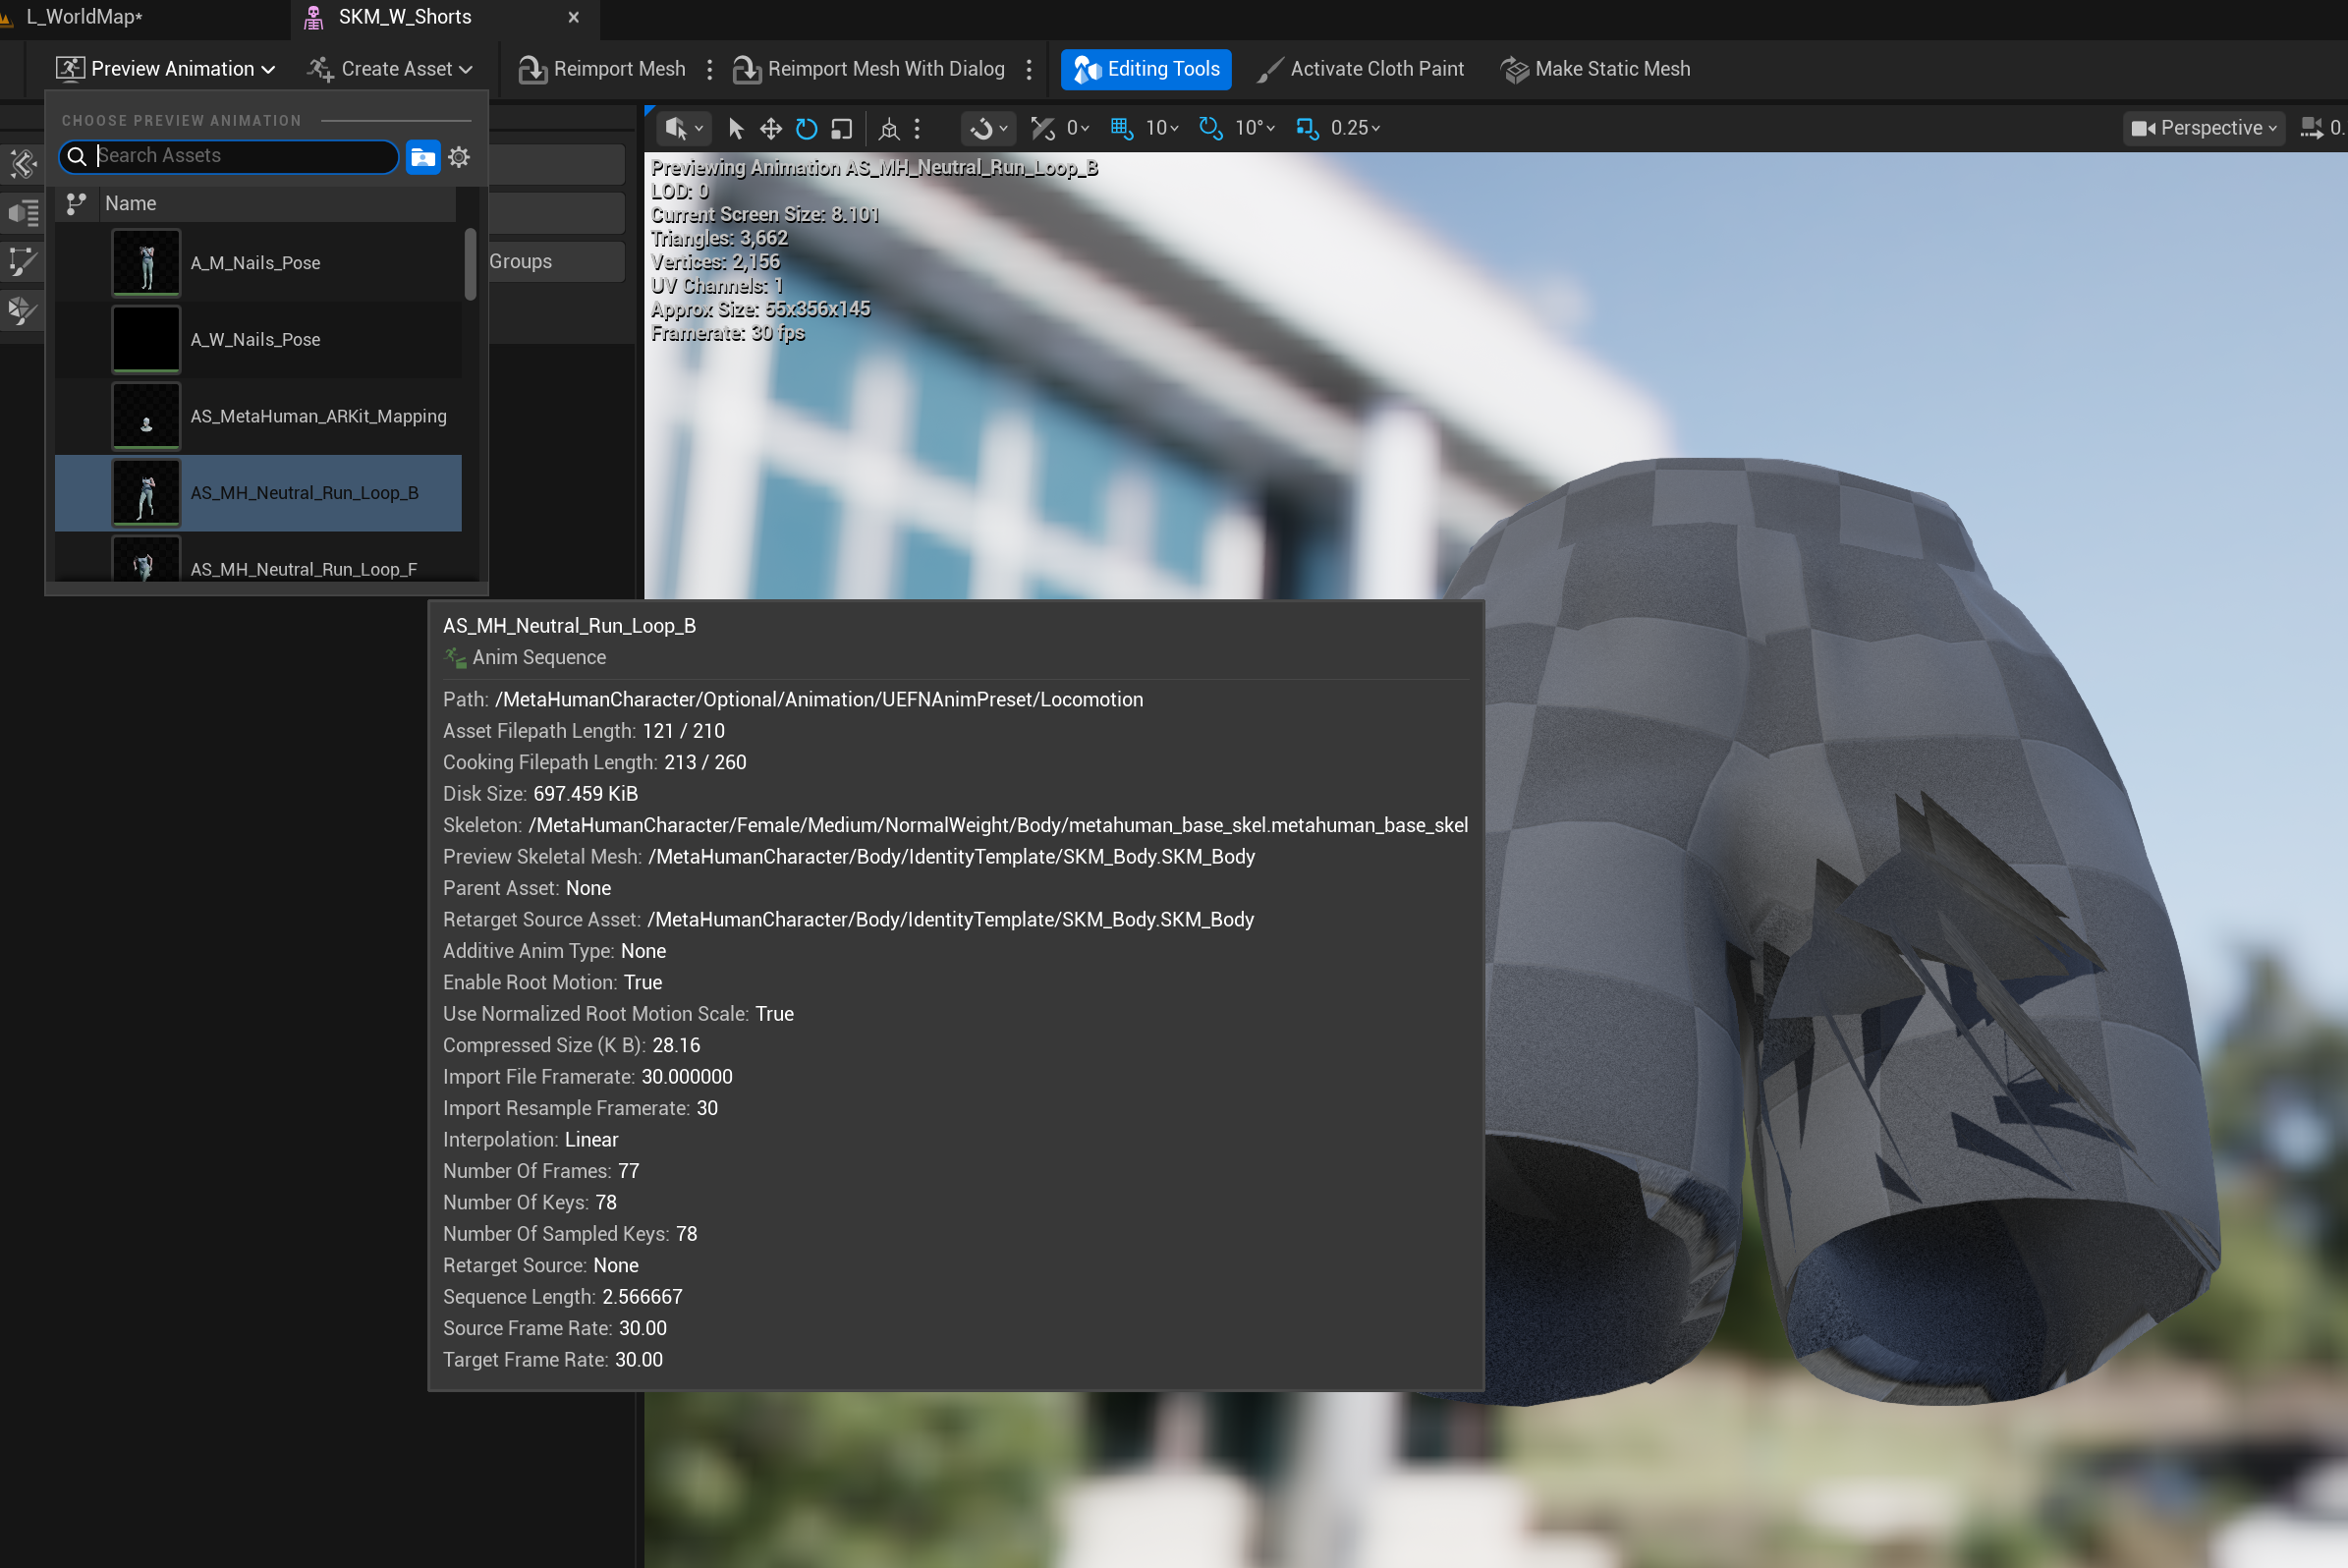
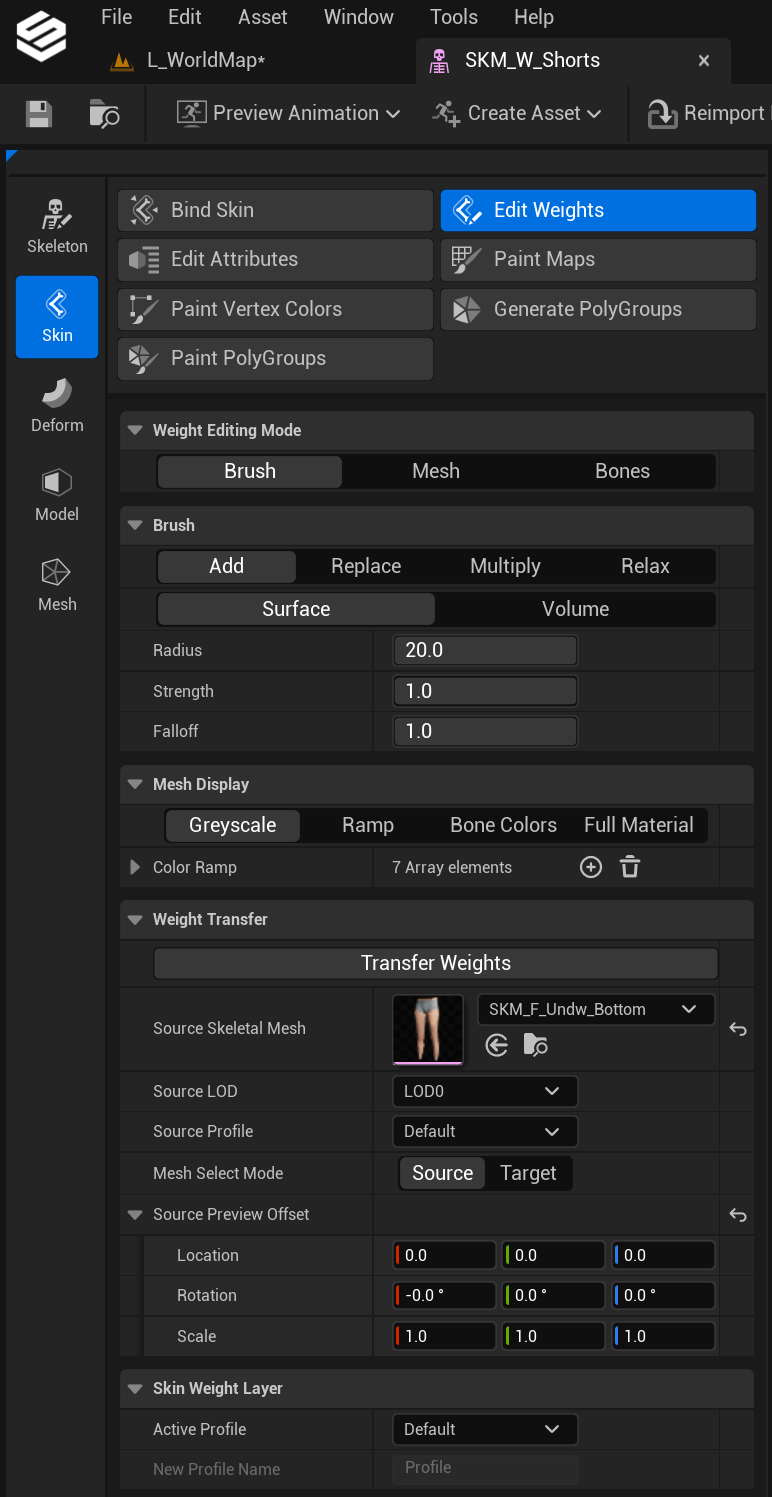
If this happens, it's important to adjust your weight painting. You can do this in your modelling package or directly in HELIX Studio. However, here's a quick method that may fix it:
1 - With your skeletal mesh open, open the "Skin" tab on the left.
2 - Press "Edit Weights" (here you can paint or transfer weights).
3 - Then expand the "Weight Transfer" tab.
4 - Define a "Source Skeletal Mesh" (assign the source skeletal mesh you used as a reference for your wearable, e.g. SKM_F_Undw_Bottom).
5 - Set "Mesh Mode" to "Source".
6 - Set "Location" and "Rotation" to 0,0,0.
7 - Hit "Transfer Weights", then press "Apply to Asset".
Set Up LOD Data#
Your wearables need valid LOD data to work properly with HELIX Character Creator. To ensure that, open your imported skeletal mesh asset and find the LODSettings property. It must be assigned one of the LOD Settings Data Assets listed below, according to the type of wearable:
| LOD Settings Data | Path | Description |
|---|---|---|
| Clothing_Body_LODSettings_Medium | /MetaHumanCharacter/Clothing/Clothing_Body_LODSettings_Medium |
Use for wearables attached to the body part of the character (anything below the head) |
| Clothing_Face_LODSettings_Medium | /MetaHumanCharacter/Clothing/Clothing_Face_LODSettings_Medium |
Use for wearables attached to the head part of the character (anything above the neck, except hair) |
| Hair_LODSettings_Medium | /MetaHumanCharacter/Hair/Hair_LODSettings_Medium |
Use for hair meshes |
| Face_LODSettings_Medium | /MetaHumanCharacter/Face/Face_LODSettings_Medium |
Internal data asset. Automatically assigned to generated MetaHuman heads with the MetaHuman character generator. |
| Body_LODSettings_Medium | /MetaHumanCharacter/Body/IdentityTemplate/Body_LODSettings_Medium |
Internal data asset. Utilized in base cut body meshes. |
You will end up having something like this:
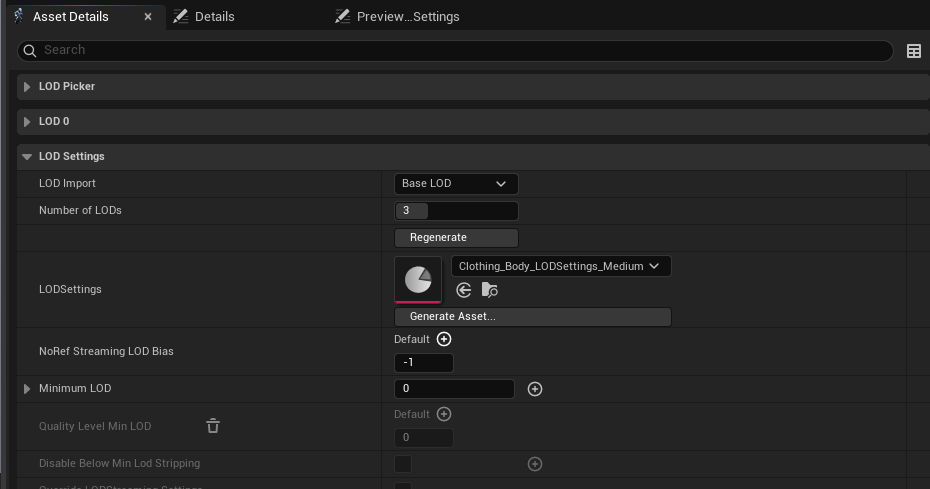
After assigning the data asset, set the Number of LODs field to 3, and hit the Regenerate button to generate LOD data with the new settings. (It may say “Apply Changes” first - select that button and then press again to regenerate)
Vault Packaging LOD Settings Rule
If the skeletal mesh uses anything other than the listed data assets for LOD settings, or a LOD count other than 3, the Vault packaging process will fail.
Set Up Materials#
Your wearables need to use one of the defined master materials listed below to be compatible with HELIX Character Creator:
Master Material Table
| Master Material | Path | Description |
|---|---|---|
| MM_Basic_Wearables | /HelixCharacterCreator/Materials/MM_Basic_Wearables |
Base material for all wearables. Can be used for basic hair by enabling the "Masked Material" toggle. |
| MM_BaseCloth_Glass | /HelixCharacterCreator/Materials/MM_BaseCloth_Glass |
Base material for transparent sections of wearables (e.g. sunglasses) |
| MM_Stitches | /HelixCharacterCreator/Materials/MM_Stitches |
Base material for masked stitch sections of wearables |
| M_Invis | /HelixCharacterCreator/Materials/M_Invis |
Invisible material. Can be used to hide specific sections of wearables if required. |
| MM_Hair_1 | /HelixCharacterCreator/Materials/MM_Hair_2 |
Base material for hair meshes. Advanced and still in development - Use MM_Basic_Wearables with mask toggle for a simplified, stable setup. |
| MM_Hair_2 | /HelixCharacterCreator/Materials/MM_Hair_2 |
Base material for hair meshes. Advanced and still in development - Use MM_Basic_Wearables with mask toggle for a simplified, stable setup. |
Before we start, important things to bring up:
- Additional Master Materials: You can also use any base engine material from the
/Engine/EngineMaterials/folder, which is currently whitelisted in the packaging rules. - Vault Packaging Material Rule: If the skeletal mesh uses any material instance inheriting from a master material other than those listed, the Vault packaging process will fail.
-
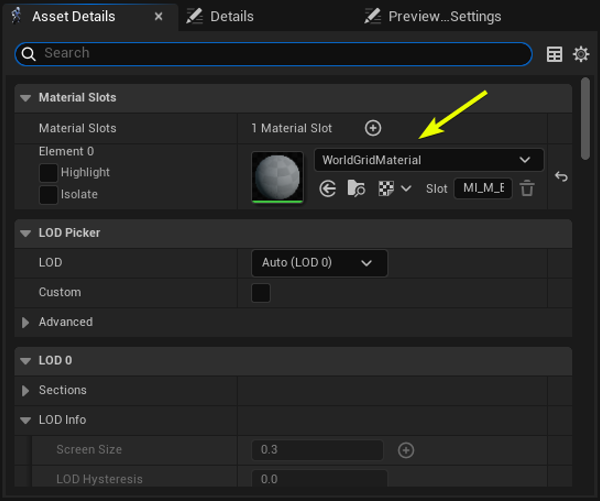
Material Slot Requirements: Wearable skeletal meshes used in HELIX Character Creator must follow a naming convention in which each material slot is assigned a numeric value, starting at 0 and increasing sequentially, as shown in the image. This value is defined in the field next to Slot for each material element under Material Slots in the Asset Details panel.
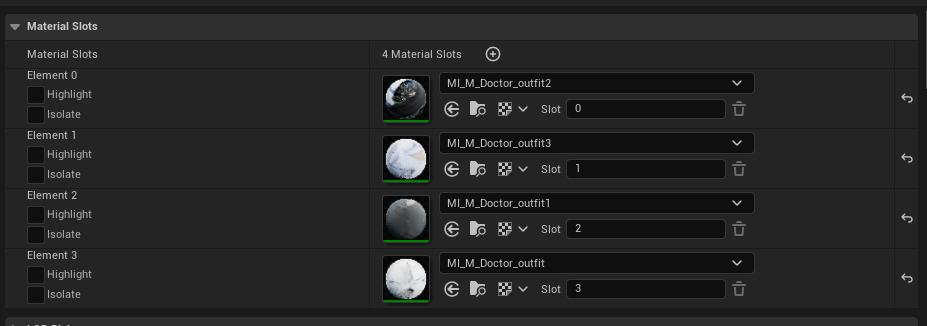
Please note that wearables are currently limited to 8 material slots, and remaining slots won't render on the character when equipped. While this is the maximum supported amount, we strongly recommend using only 1–2 unique materials per wearable to achieve optimal rendering performance.
Now, we are ready to start creating material instances. The workflow will go through the set up of the basic wearable material, which we recommend for most use cases:
-
Right click an empty area in the content browser and select
Material Instancefrom the menu: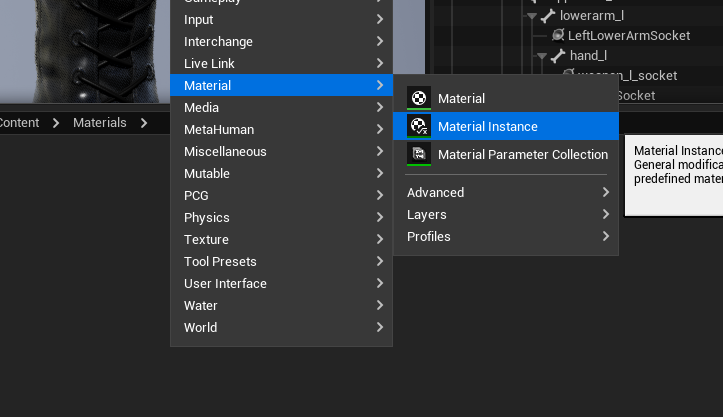
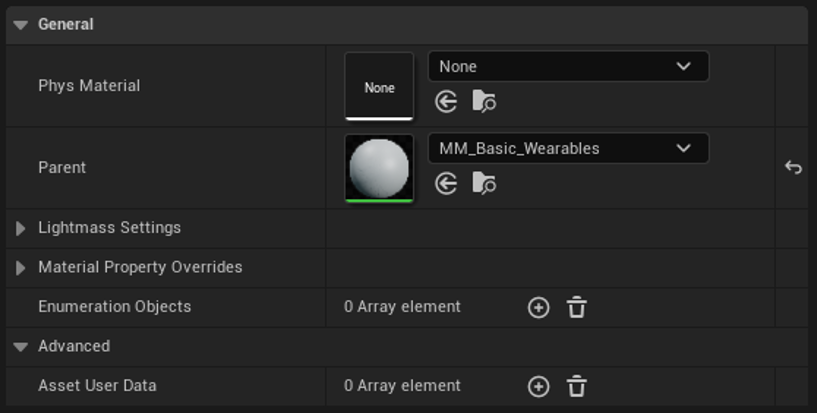
-
Open the material instance and pick one, e.g. MM_Basic_Wearables as the parent:
-
Add your base textures into the corresponding fields and enable and configure tint if you'd like:

-
Assign the new material instance to one of the slots on your skeletal mesh.
-
Repeat the steps for each slot if you need different materials per slot.
Material Options#
Our master material includes a wide range of options to support different material types and workflows. The settings you use will depend on your material, the level of control you require, and how your texture maps are configured.
Texture Maps
The Texture Maps section is the primary area for assigning textures to your material.
By default, only the Base Color (Albedo) and Normal Map slots are visible. To use additional PBR maps such as Ambient Occlusion (AO), Roughness, or Metallic, you must first enable them in the Toggles section.
Only enable texture maps that you intend to use. If a map would contain a single flat value across the entire texture (for example, a fully metallic surface or a constant roughness value), we recommend leaving the texture option disabled and using the controls in 05 - Float Variables instead. This reduces texture memory usage and improves efficiency.
For example:
- Set Metallic to 1 for a fully metallic material.
- Set Metallic to 0 for a non-metallic material.
- Use values between 0 and 1 to achieve varying levels of metallic appearance.
The same principle applies to Roughness values.
Assigning a Base Color (Albedo) Texture
To assign a Base Color texture:
- Open the Texture Maps category within the Material Instance.
- Check the box beside the appropriate texture slot to make the parameter editable.
- Assign your texture using one of the following methods:
- Search for the texture directly in the field.
- Drag and drop the texture into the field.
- Select the texture in the Content Browser and click the arrow button beside the asset picker.
Assigning Additional PBR Maps
If your material uses additional PBR maps, assign them in the corresponding texture slots.
As mentioned above, texture usage for Ambient Occlusion, Roughness, and Metallic maps must first be enabled in the Toggles section.
Using Packed ORM Maps
If you are using two or more of the following maps:
- Ambient Occlusion (AO)
- Roughness
- Metallic
we strongly recommend packing them into a single ORM texture. This reduces texture memory usage and improves performance.
If you are not using a packed ORM texture, disable the Use Packed ORM option.
Converting Glossiness Maps
If you are importing textures from another workflow or a modding project, you may encounter a Glossiness map instead of a Roughness map.
To use a Glossiness map, simply invert it in an image editing application to create a Roughness map.
Additional Material Options#
The material includes several optional features that provide additional control and customization.
To maximize performance, disable any feature that you are not actively using via its corresponding toggle.
Extra Colors (Color Masking)
One example of an advanced feature is Extra Colors, also known as Color Masking.
This system allows you to use a colored mask texture to control tintable areas of a material.
For example, imagine a shirt with buttons:
- The shirt area is colored red in the mask.
- The button area is colored green in the mask.
The material can then use these RGB channels to apply separate color tints to each area.
Setting Up Extra Colors#
- Enable the Extra Colors feature.
- Create and assign an RGB color mask texture.
- Adjust the corresponding color parameters within the material.
The color parameters are also exposed within the Character Creator. (as long as you set up the RGB mask tint in the wearable data asset)
If all color values remain set to White and their corresponding Opacity/Alpha values remain at 0, the material will display its original Base Color texture by default. However, with Extra Colors enabled, users will still be able to customize the masked regions through the Character Creator, allowing them to recolor specific parts of the asset as desired.
8. Integrate Into HELIX Character Creator#
- Find the
DA_Wearablesdata asset in your package folder and open it. - Select the appropriate wearable type (e.g. Bottoms).
- Press "+ Add" to create a new element in the category you chose.
- Give your new wearable a unique ID by double clicking the tile's name (e.g. M_SportsShorts01 — M denoting Male).
-
After creating your data asset entry, fill in the properties as shown in the screenshot below. There is also a handy table below the screenshot with detailed information per suggested field.
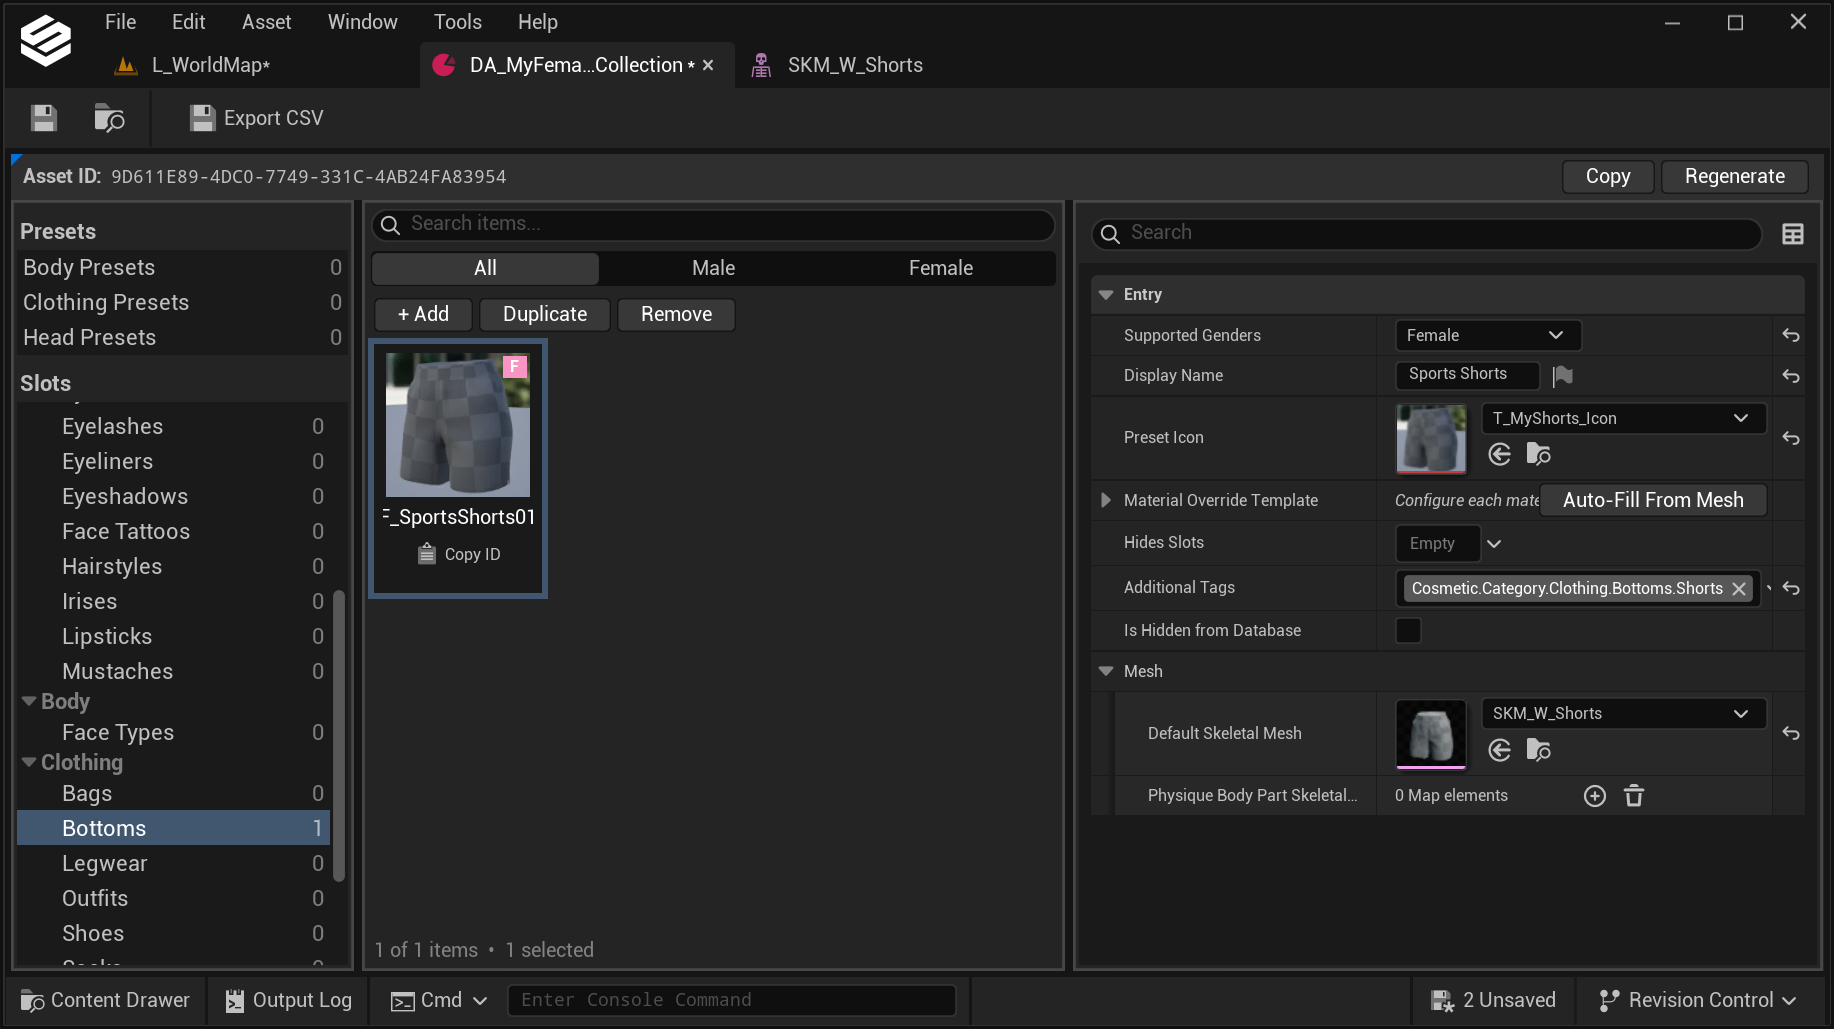
Further information on each suggested field
| Property | Description |
|---|---|
| Supported Genders | Base character gender that this wearable is available to. A single wearable entry should only have one gender selected. |
| Display Name | A meaningful name shown in the UI. |
| Preset Icon | An icon texture, if you have one. |
| Material Override Template | If your mesh has a correct setup as described in the Material Setup step, clicking "Auto-Fill From Mesh" will automatically add runtime coloring support for your wearable. After slots are created, you can rename the Display Name fields to describe each material slot of your mesh. Please note that the "Auto-Fill From Mesh" will only become clickable after assigning the corresponding mesh at the bottom of the panel in this data asset. |
| Hides Slots | List of cosmetic slots to hide when this wearable is equipped. You can either hide body parts if your clothing fully covers them, or hide other clothing slots if your wearable is likely to conflict with them. |
| Additional Tags | List of additional metadata tags for your wearable. These tags are used for categorization purposes in the HELIX Character Creator UI. |
| Is Hidden From Database | Hides your entry from the HELIX Character Creator UI, if enabled. |
| Mesh | Assign the imported skeletal mesh here. |
9. Test Your Wearable In HELIX Studio#
You can test your new wearable on a character using the HELIX Character Creator directly in HELIX Studio.
As long as your asset is added to your package plugin folder and you have correctly set up your data asset (defined name, gender, icon, and mesh), you will see your wearable in the corresponding menu inside HELIX Character Creator. Make sure you save all of your imported and created assets.
To test in HELIX Studio, follow the steps below:
-
Press Play in the HELIX Studio editor. The Play button is just above your viewport (you can also press
Alt + P).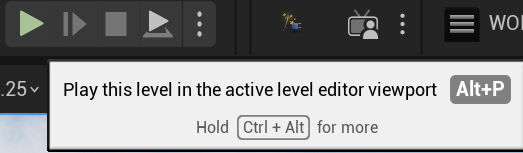
-
Once the game simulation and your character have loaded, press the
Pkey to open HELIX Character Creator. - In the HELIX Character Creator UI, be sure to select the gender your asset was created for. You can switch gender using the buttons in the top left of the viewport.
- Now you should be able to navigate to your new wearable using the HELIX Character Creator interface to find it.
- Once you've selected your wearable, press
Save and Exit. This allows you to run around in the test level and see your wearable in action. - To exit playmode you can press
Escand select "Leave World" or you can pressShift + Esc.
10. Package & Publish Your Clothing#
To use your wearable(s) directly inside HELIX, you need to package/publish it.
- Navigate to
Packages > Manage Packages > YourPackageName. -
Finalise all fields appropriately.
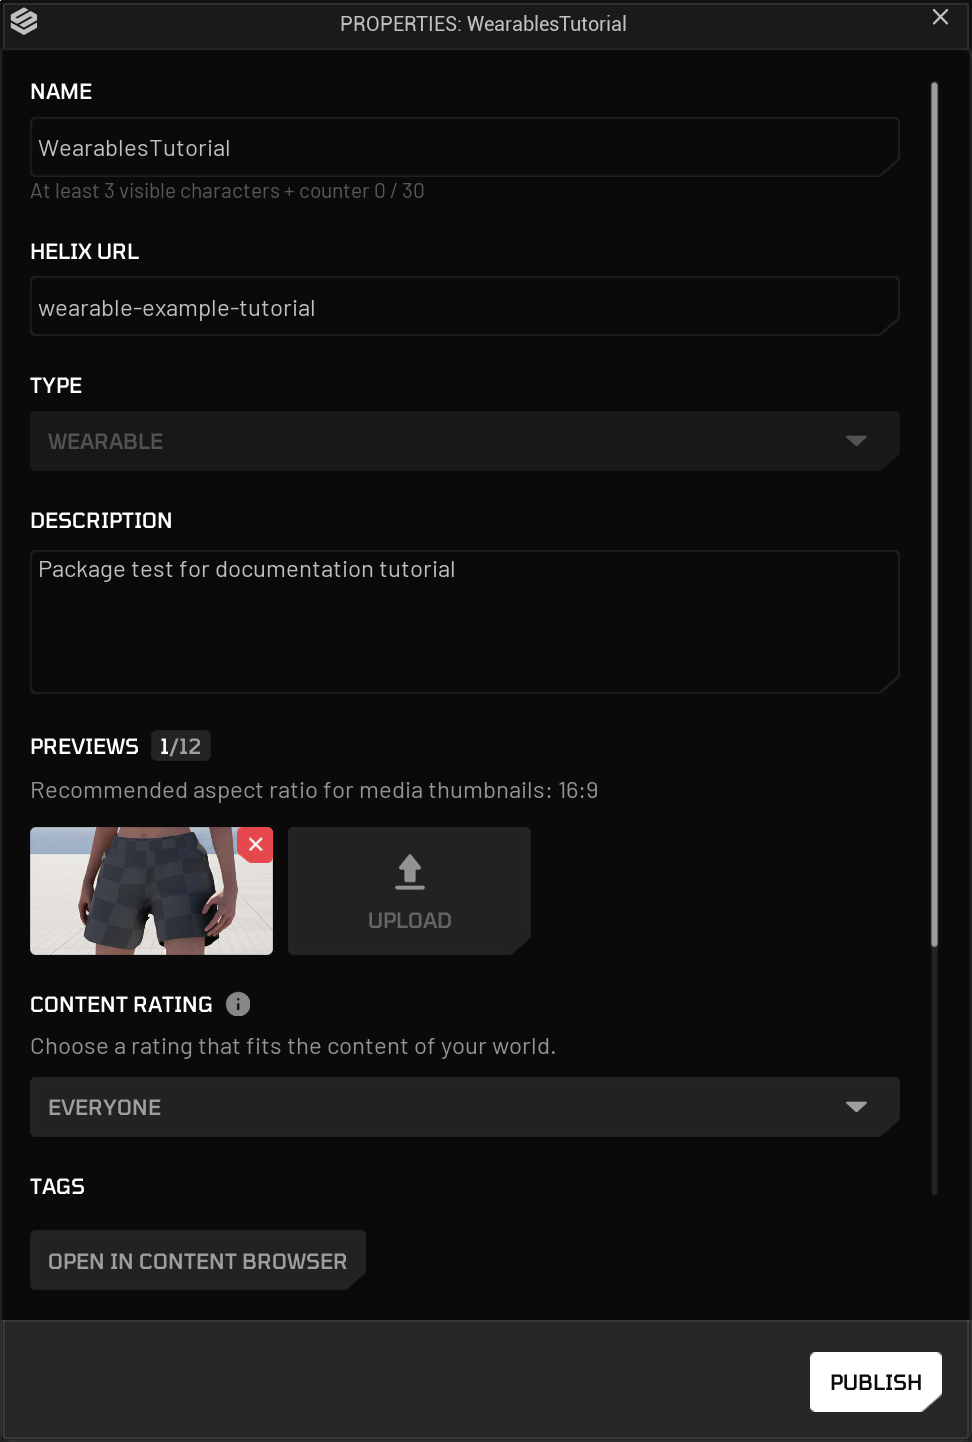
-
Make sure to toggle
Privatetoggle option if you don't want other players to see your package in HELIX Vault. You will be able to grant access to invidual players in Creator Hub. - Hit
Publish. - In the publish window you have multiple options:
- Package Locally gives you a pak file, which you can add to your HELIX Game files directly.
- Upload to Vault uploads your package to the Vault. Here you can choose whether it's publicly visible, only visible to you, or only visible to certain users.
- In the publish window you also have the choice of updating a current package, making it the latest, or publishing as a new package.
- Double-check that the correct package is selected to publish, and hit
Start.
Your package will now begin to cook, pack, and upload to the Vault.
11. Check & Manage Your Uploaded Packages#
To view your published packages, you can use the HELIX Creator Hub.
To access the Creator Hub, navigate to Account > Creator Hub.
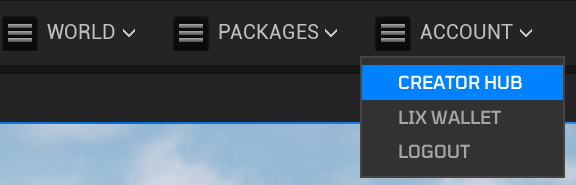
This opens your web browser. Once you're signed into your HELIX account, you should be able to see all of your uploaded packages, manage their details, etc.
12. Test Your Wearables In HELIX#
- Load HELIX.
- Navigate to the Vault tab.
-
Locate your uploaded package (tip: you can filter by "MY PUBLISHED").
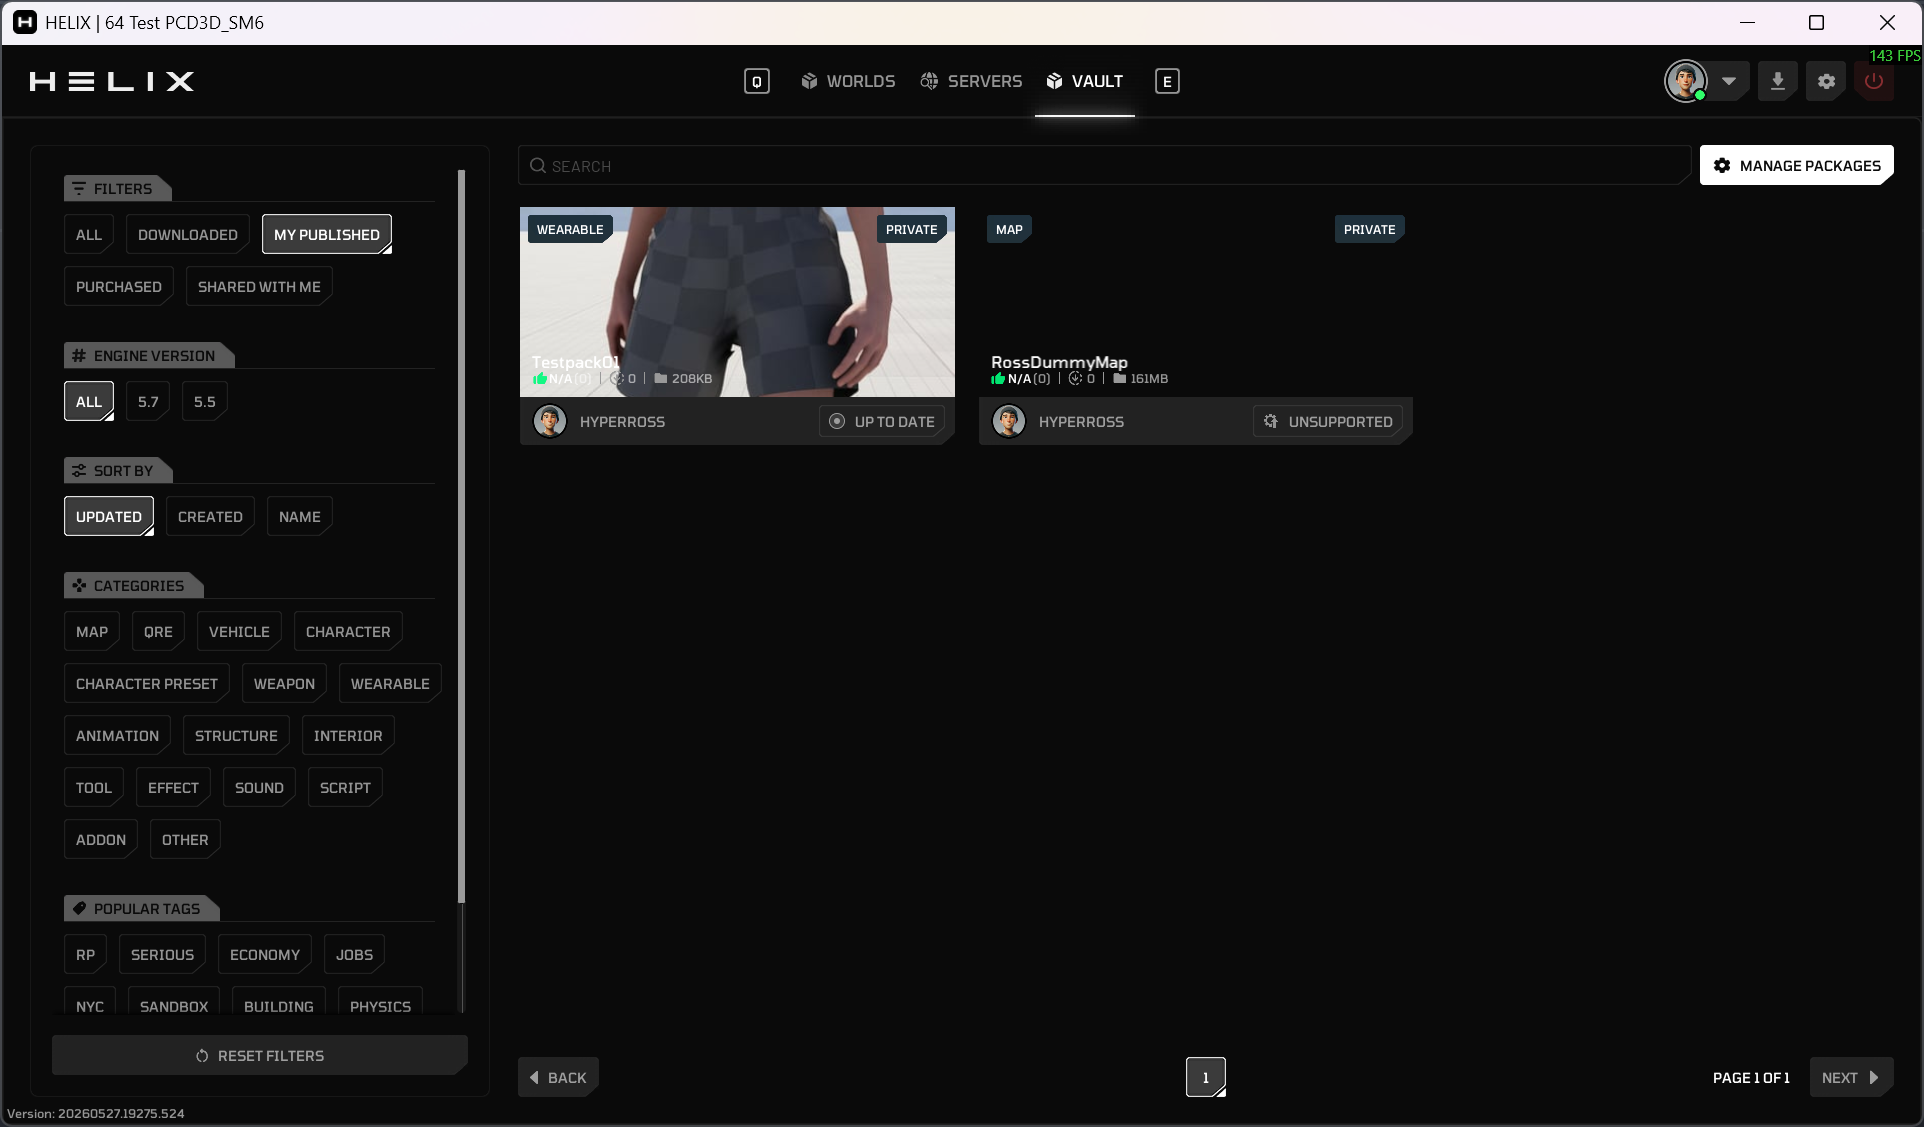
-
Open it by clicking it and pressing "Preview".
This loads a blank test world with your package ready to go. Simply follow the same steps as testing in HELIX Studio, e.g. launching HELIX Character Creator by pressing
P, and your wearable will be there.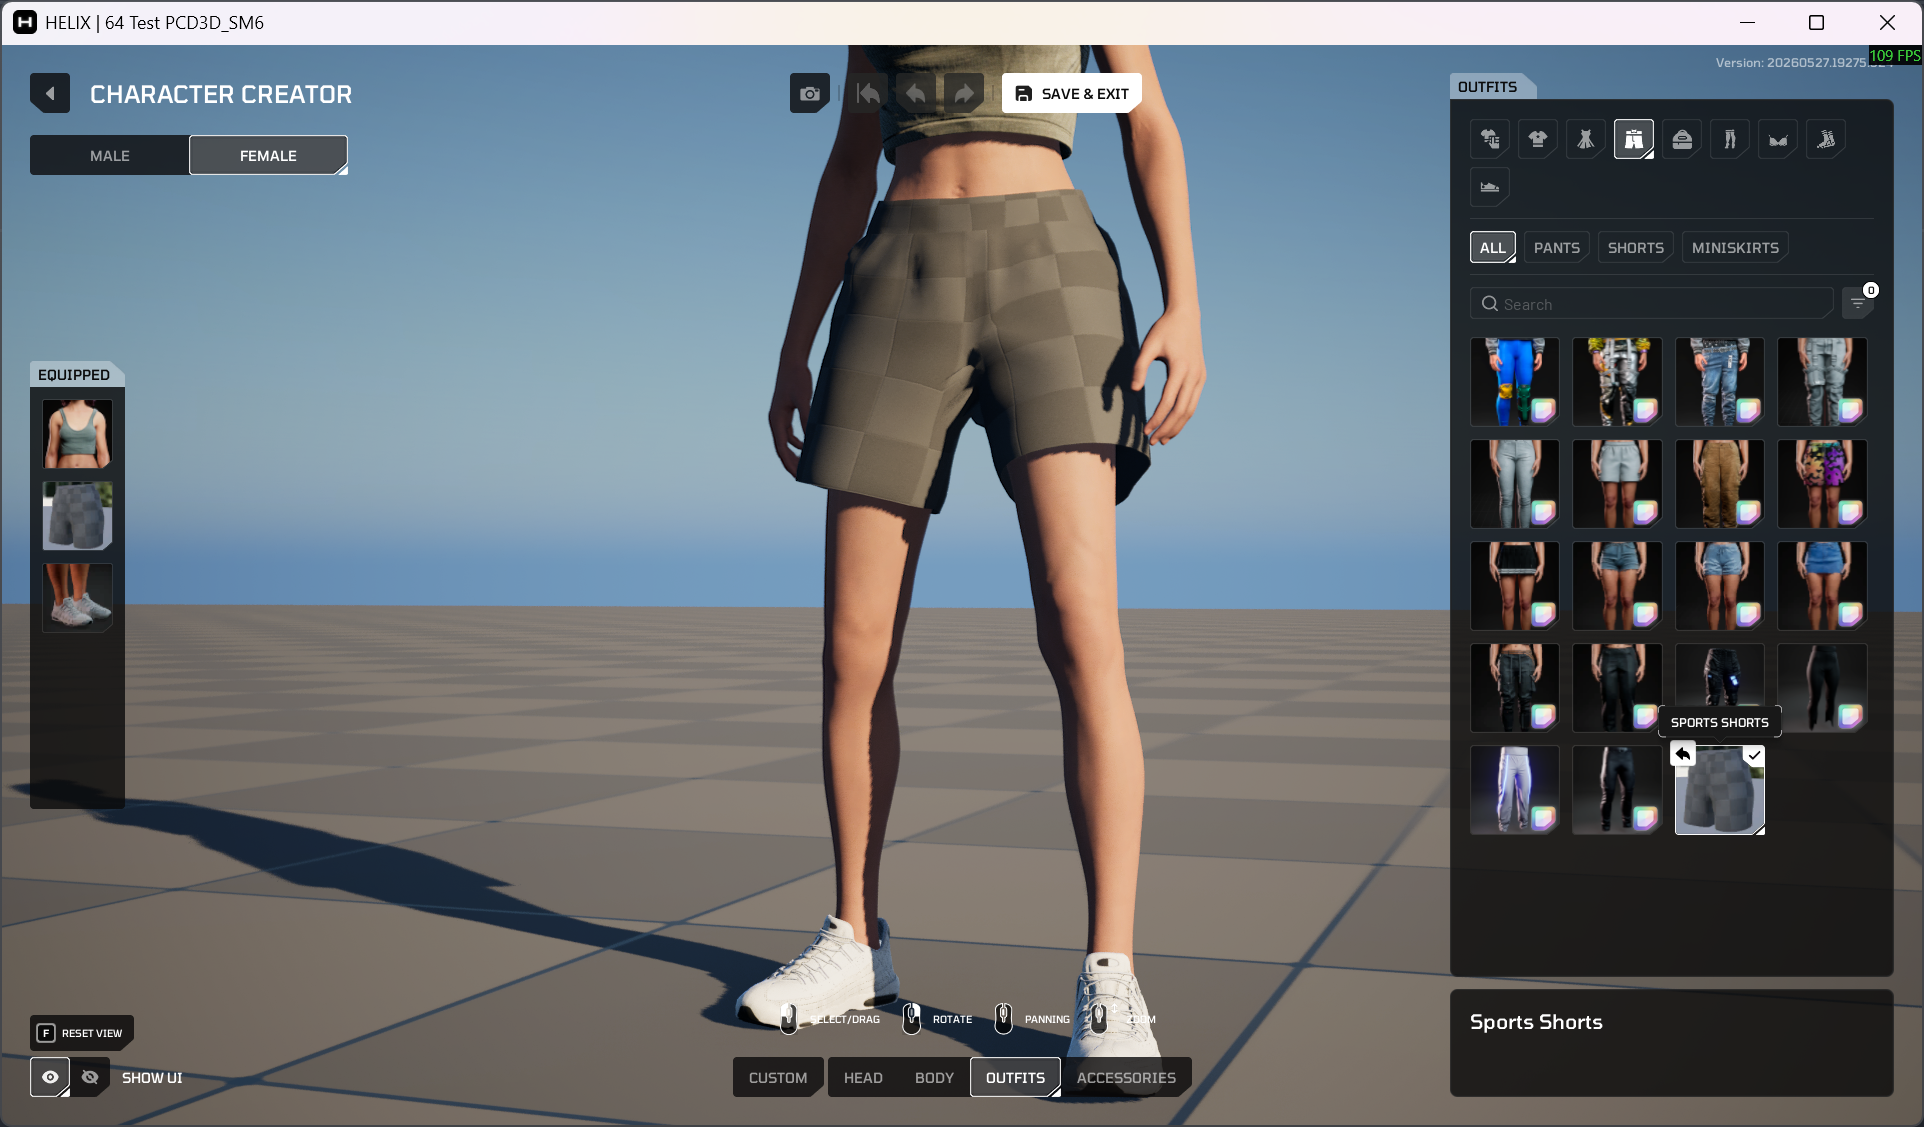
13. Ready To Rock#
Once you've followed these steps, uploaded your package to the Creator Hub, and imported it into your world, your new wearable items will be available for players joining your public world!